
Hi apprentice photographers, in this article, I’m going to give you lots of little tips to learn how to take beautiful portraits.
Personally, I don’t consider myself a portrait photographer, because my core business is more reporting. But hey, when we do reports on people, obviously we still do a lot of portraits. So I wanted to give you several tips to progress in portraiture and dare to get started!
Small precaution of use before starting, I give her advice which is far from being absolute rules. They are there to help you start portraiture and improve your images, but you might as well transgress them and imagine something else, that’s called being creative. But I still advise applying these few tips when you start, to learn and not to get too frustrated. Once you have mastered the subject and are comfortable with portrait photography, you can try to be a little crazier!
We will start first with a few small technical points, then we will talk about composition, shooting, and relationship with the model. But the criteria are not ranked in order of importance, it’s just the order in which they came to mind.
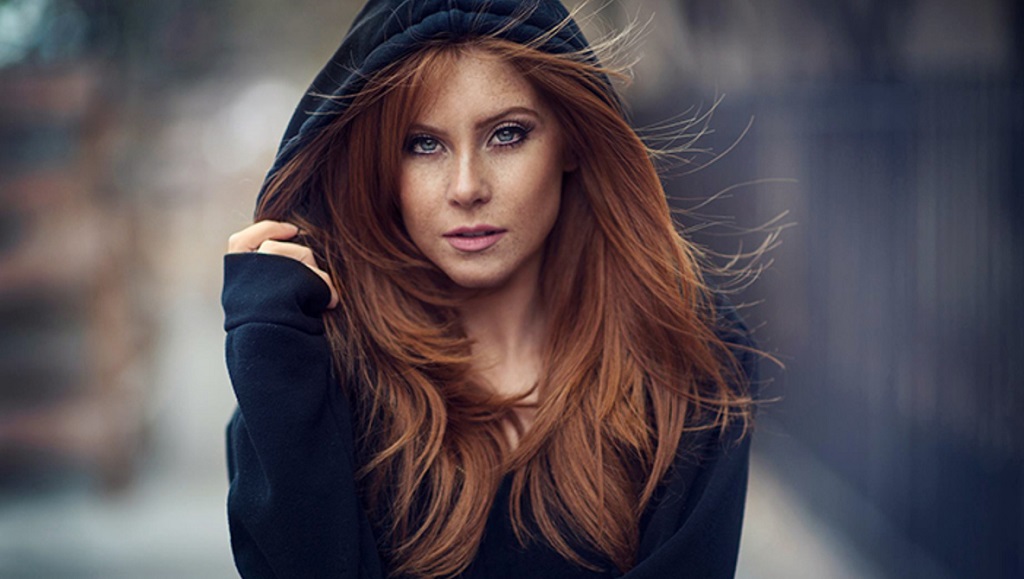
1. Focus on The Eyes
The eyes in the portrait are the most important. Imagine talking to a friend, you look him in the eye right? In photos it’s the same, you want your model’s eyes to be the first thing you see, what you pay the most attention to. And the easiest way to focus the viewer’s attention is to use sharpness. So we focus on the eyes. If you are skeptical, quickly experience it for yourself. Have your partner or little brother pose for you for a little while and take the same wide-aperture shot twice, one with the focus on the eyes, and the other with the focus on the eye. nose. Compare the results, then which one looks weird ?!
Be careful, the eyes are not the glasses, eh, they are the eyes. Otherwise, you risk having funny results where the glasses are sharp but not the eyes.
What if the two eyes are not the same distance? In this case, I usually focus on the eye closest to me.
2. Choose the Right Focal Length
Choosing the right focal length is important because different focal lengths will have a very different perspective in terms of perspective. A very long focal length will crush the perspectives, while a short focal length will accentuate the perspective to the extreme, often causing distortions that are not very aesthetic … Technically, it is not the focal length that causes these differences but the distance at which we will use the model to have an equivalent framing, but let’s skip this little technical detail because the result is there. Look at this gif which illustrates the differences in rendering according to the focal lengths.
For portraiture, we will favor fairly long focal lengths, from 50 and above, such as 85mm. Personally, I use a 75 equivalent and I really like the rendering. These relatively standard focal lengths and small televisions make it possible to have a rendering that is both devoid of excessive distortions and at the same time quite close to what the human eye renders. So I advise you to start with a focal length between 50 and 85mm, in full-frame equivalent.
3. Use A Large Opening
When we do a portrait, the subject of the photo is all found, it is the model. We, therefore, want to focus the viewer’s attention on this model and not on the rest of the photo. A good way to focus attention is to keep the model in focus while the rest of the image is out of focus. For that, we need a shallow depth of field, and therefore an opening as large as possible.
As seen in the background blur video, there are other settings that will influence the depth of field. You will have to get closer to your subject, move it away from the background, and use a relatively long focal length, we’ll come back to it… If this point is not completely clear to you.
4. Compose Your Image
Just because your image is a portrait doesn’t mean you just have to make a completely centered close-up. So yes if the portrait is beautiful it is good, but if it is both beautiful AND well composed, this is where you will create extraordinary images!
In portrait as elsewhere, the composition is there to help you tell a story with your image. A tight shot is going to be all about the person. A larger shot will give context by integrating the model into a setting and tell a story that can be completely different. The choice of plan will therefore be very important.
Do not hesitate to use all the rules of compositions that you know to adapt them to the portrait. The rule of thirds can be used to place the eyes, you can use the lines to draw attention to such or such part of the body… Take the time to take care of your composition, it can never hurt!
5. Pay Attention to The Background
In a portrait, the main subject, a human being, attracts all the attention. And the rest of the photo is often slightly or even completely blurry. So we sometimes tend to neglect the background. This is a common mistake for all types of photos, for the portrait photo as for the rest.
But the entire photo matters. Even blurry, a bright spot will attract attention and distract it from the model. If we photograph a super classy model in front of a landfill (eh OSS 117!), It will inevitably be messy.
6. Avoid Portrait in Direct Sunlight
We often tend to think that the sun is a photographer’s best friend, and that’s often wrong! When it comes to portrait photography, the sun is a real problem, at least during the day. Sunlight is a very harsh light, which will therefore provide very strong shadows. Also, this light comes from above, and we cannot direct it. The result is very pronounced and very unsightly shadows on the face. If the sun is really strong, the browbones will create a strong shadow on the eyes which will be completely in the dark. It’s really not pretty, to say the least …
The solution is to avoid direct sunlight. When I do portraits and the weather is fine, especially in wedding reporting, I manage to place my subjects on the edge of shadow (i.e. in the shade, but at the limit with the light) if possible. This way I have a uniform light on their face, but I can still have the background well lit by the bright sun. I know this story of doing portraits in the shade might sound counterintuitive, but go and experience it for yourself and I’m sure you’ll be convinced immediately!
7. Leave Room for Gaze
In front of a portrait photo, the viewer’s eye has a natural tendency to follow the direction of the model’s gaze. This is why we recommend leaving room for the gaze. Clearly, you need to frame your model so that it looks on the side of the photo where there is the most space. Otherwise, we have the impression that the model is looking out of the frame towards something that we do not see that does not concern us. In some cases, it can serve as the intention of the photo, but most of the time it will just give the photo a bit of a weird vibe… So avoid if possible.
8. Don’t Cut Your Chin
Never cut your chin. Never, it’s ugly! That’s all, I can’t explain everything either! Strangely, for a very tight portrait, you can easily cut the forehead, but cutting the chin really doesn’t work… Ok ?!
9. Break the Symmetry
With rare exceptions, the portrait lends itself poorly to symmetry. The human body is already symmetrical, placing it in a symmetrical environment will create a kind of feeling of immobility, stability, strength. If this is an effect that can be sought for the male portrait, when you take a picture of a woman, you tend to show softness. In general eh .. you are free to want to show something else!
We, therefore, avoid composing portraits that are too symmetrical, on several levels. Composition, the position of the model, you have to pay attention to everything. We ask his / her model not to have both shoulders completely facing the camera, we tilt our head a little, if it is a full-length portrait we can for example cross our legs, we put one hand in the pocket. The examples are extremely numerous. Remember that oblique lines bring dynamism to your image! So break the symmetry for more lively portraits.
10. Get Moving!
A portrait doesn’t have to be static. Yet we all get a little the image of posed portrait, even passport-type photos. But who said the portrait had to be still? Race your models, spin them around, make them laugh, and catch it all on the fly! Expressions in the movement are often much more natural, and the photo gives off a lot more energy!
11. Establish Contact with The Model
This is arguably the most important tip of all, so much so that he deserves a full video on his own! It is essential to establish contact with the model. Especially if it’s someone you don’t know – there’s always some sort of invisible bubble that you surround yourself with when you meet someone. Well, your first job as a portrait photographer is to shatter this bubble. Not with an ax, it might make your model run away, rather trying to make a connection, chatting, making jokes. The point is really to make the model feel comfortable and confident with you.
If not, chances are it will show in the final photos. A tight and uncomfortable smile will always be much less aesthetic than a burst of laughter!
It was the most difficult for me when I started portrait photography. It requires really giving your personality because it’s up to the photographer to make the connection and not the model. Sometimes it’s a bit long, but it’s worth giving yourself a bit for more authentic images. And obviously more beautiful …
12. DARE THE BLACK & WHITE
The portrait lends itself particularly well to black and white. Black and white have this tendency to bring out textures and highlight contrasts. Nothing better than to bring out the texture of the skin, to highlight a little pale skin or dark hair, etc. Portrait photography is (in theory) quite simple, the idea is to show a person in pictures. Black and white reduces distractions due to color and makes the viewer focus even more on the model. I don’t have much else to say on this point except … go for it!
13. Forget All My Advice
One of my favorite portraits of Pauline contradicts half of these rules: It is centered, the eyes are closed… in short, it is not a classic portrait but yet I love it. Always remember that photography is a creative area that you can’t really put rules on. If we talk about rules, they are more aids to composition than anything else… Lean on them to learn, and choose to ignore them as soon as you are in the mood.