

You know how they say smell is the strongest sense tied to memory? Well, it’s true! One whiff of my grandma’s snickerdoodle cookies brings me right back to her cozy little kitchen. A bout of my dad’s pungent aftershave elicits memories of story time before bed. And the moment I catch a whiff of my husband’s cologne, images of our first date come rushing back. Smells really do have a direct line to our memories and emotions.
So I had this idea the other day – what if I could capture some of my all-time favorite memories in a smell? Not to brag, but I’ve been blessed with an abundance of beautiful memories over the years. From lazy summer afternoons spent lake-side as a kid, to falling in love under the Eiffel Tower, to the sweet scent of my newborn. I wanted to bottle up these precious memories to be able to enjoy every day. And what better way than in an photo air freshener!
What You’ll Need
Alright, let’s talk supplies. This DIY photo air freshener takes hardly any ingredients – stuff you likely have laying around the house already! Here’s your shopping list:
- Your favorite photos – either printed or on your phone/tablet
- Wax melts or oils like essential oils or fragrance oils
- A jar, tin, or container to hold it all
- Bamboo skewers, sticks, or reusable straws
That’s it! Told you this one was easy peasy. Now let’s dive in and make some memories, shall we?
Choose Your Photos
As they say, a picture is worth a thousand words. So the most important component to this project is choosing some photos that depict your most precious memories. I picked a handful that represented special times in my life that I wanted to reminisce on.
Maybe that’s a faded photo of your childhood dog who always comforted you when you were sad. Or a snap from your dream honeymoon destination that fills you with joy every time you see it. Perhaps it’s a candid shot of your now-grown kids splashing around the pool as little tykes. Select images that make your heart swell with love and happiness.
You could even theme your air freshener around a specific person or time period! I made one with pictures of just my grandchildren that makes me think of them anytime I get a whiff. The options are endless – have fun with it!
Pick Your Scent
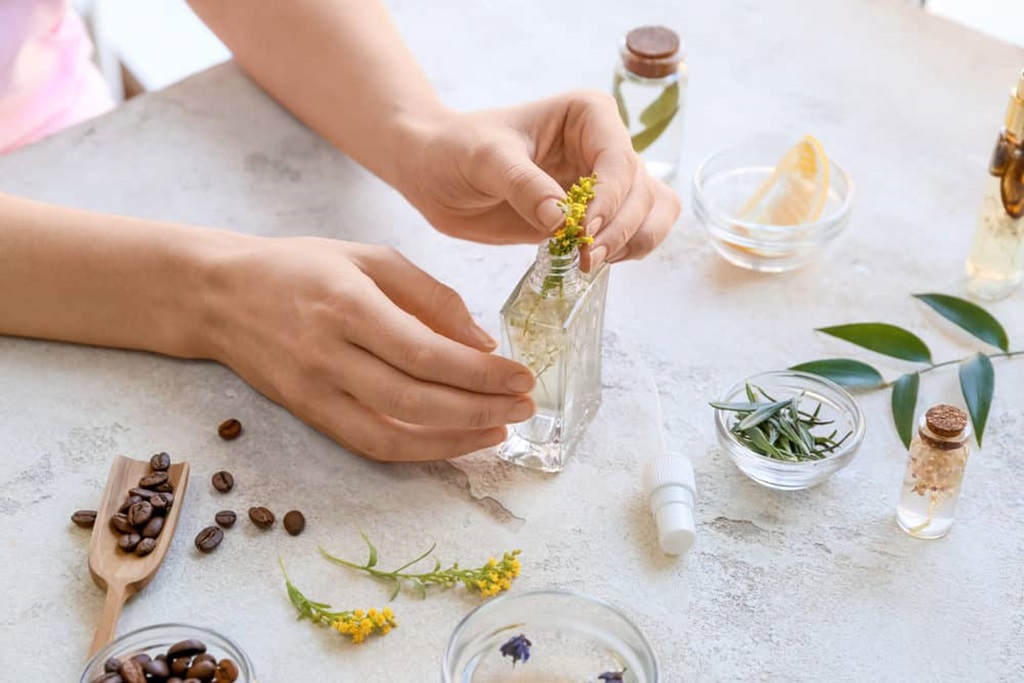
Now for the best part – the smell! With so many wax melt and fragrance oil options out there, you’re sure to find the perfect scent to complement your photos. I like using essential oils or fragrance oils since the smell tends to linger longer than candles or melts.
Go with a smell that reminds you of the people or memories in your photos. For my lake house memories air freshener I used a water lily scent since it made me think of lazy summer days on the water. And for my Paris honeymoon pics, I chose a sweet floral that felt romantic.
You could even blend a few fragrances together for a custom combo! Spend some time sniffing different scents until you land on “your” smell.
Prep Your Container
Now you’ll need something cute to hold your smell-good pictures. I typically repurpose things like empty jelly jars, altoid tins, mini terracotta pots – anything that lets the scent escape.
Make sure to thoroughly wash and dry whatever container you choose first. You may also want to attach a small rope, twine, or embellishment to make it easy to hang or display around your home.
Get ready for the fun part – let’s put it all together!
Assemble Your Creation
We’re in the home stretch now, just a little DIY assembly is required. Start by placing your pictures in the bottom of your cleaned container in a fanned-out collage. Printed photos work great, but you can also display pictures on your phone or tablet.
Next, place 1-2 bamboo skewers or reusable straws in the photos so they stand up in your jar. Then dot, sprinkle, or pour your preferred wax melts or fragrance oils around the photos, letting them soak into the sticks.
If you have an absorbent container like terra cotta, you may want to soak the entire thing by pouring oil over the photos until saturated. Use your discretion based on your container.
And….done! Wasn’t that easy? Admire your cute DIY creation – now just give it a day or two for the smell to fully diffuse before displaying. Then get ready to enjoy that instant whiff of nostalgia whenever you pass by!
Display Your Memories
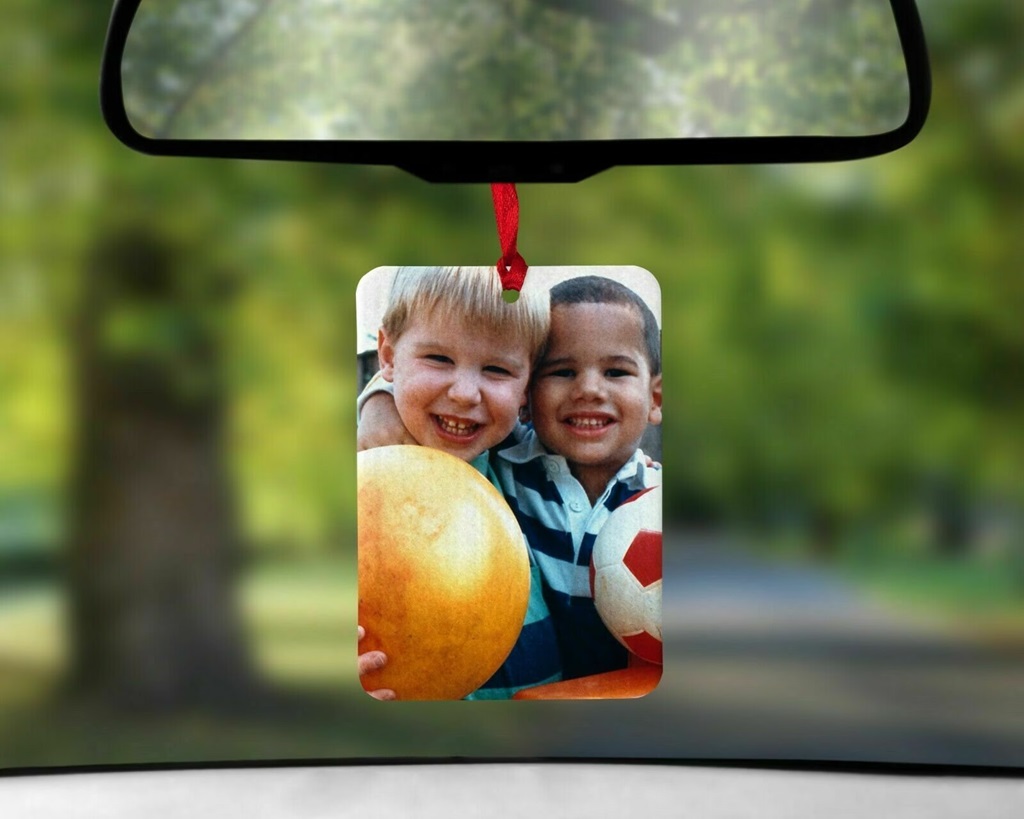
Now comes the best part – finding cute ways to display your photo air freshener around your home. I like to place mine:
- On bookshelves
- In the car or camper
- By my bedside table
- On bathroom counters
- In closets or dressers
- In the nursery
Basically, anywhere you could use a scent boost or memory pick-me-up! Feel free to get creative with ways to show off your meaningful memento.
Change It Up
The best thing about this project is you can switch out photos, smells, and containers whenever you want. If you ever need a memory change-up, simply create another DIY air freshener.
You could even gift these to friends and family! Customize one with their special photos and inside jokes for a heartfelt present.
Well there ya have it – a simple way to keep your fave memories close with a DIY photo air freshener. Anytime you get a nostalgic whiff, it’s sure to make you smile.
Happy crafting!
FAQs
How long will my photo air freshener last?
This depends on the potency of your oils/wax and how exposed it is to air. Most will last 2-4 weeks before needing to add more fragrance. Absorbent containers like terra cotta tend to need more frequent oil replenishment.
Can I use real flowers instead?
Yes! You can create a lovely dried floral photo display using real lavender or rose buds. Just note that real flowers have a shorter lifespan before needing to be replaced.
What if my photos aren’t printed?
No problem! Simply load some favorite images onto your phone or tablet and display. Just be careful with liquids if displaying electronics.
How do I get the oil smell out of my photos?
Gently wipe prints with a microfiber cloth dampened lightly with rubbing alcohol. Let photos fully air dry afterward. You likely won’t be able to salvage oils off actual electronics – so handle carefully if displaying directly.
Can kids help make this craft?
Absolutely! Just take safety precautions with younger kids when handling containers, scissors, oils, etc. This is a great craft for reminiscing on special memories together.